Create Your Own Javascript Library with Typescript
As a frontend developer, you are going to need Code Libraries in order to support your project development. You can easily optimize your code by making the code reusable so it would not make your code going fat and redundant. To make a code reusable across your projects, you can transform your code into a modular and separated one.
The best way to make your code modular is to make your own library. If you’re familiar with a library like jQuery, a library that provides you utilities to develop your Javascript project easier.
Why Typescript?
There are a bunch of benefits you can get with Typescript as a library development. The most remarkable one is the interface. Consider this example, as a consumer of a library, how would you know what parameter and return type when using a function? There are something like jsdoc and the library’s documentation. But none of these provides the experience offered by TypeScript out of the box.
With TypeScript and the help of IDE and editors like VScode, we can get a detail of a function from the libraries you are using. You can get autocompletion and more information on the return type and parameters. See the example below, we can see the fetch() function has RequestInfo and RequestInit parameters, and it will return Promise of the Response interface.

Because we are going to make library, it’s highly recommended to use TypeScript, because people will use your library on their project. As a creator and the maintainer of the library, you certainly want to give them easiness and robustness during their project development.
Project Boilerplate
If you haven’t yet heard about boilerplate, it is a starter kit (or you can call it template) that can help you start your project faster. A boilerplate had already constructed the project structure and also had set up all the elements you’ll need in the development and production phase.
I have made a very simple boilerplate to support the library development in Typescript. You can check it directly on vite-ts-starter repository. It has a lot of features that certainly will boost you on your library development.
Features:
- Monorepo packages
- Playground (demo)
- CI/CD with Github Actions
- Vite with bunch of features
- Testing with Vitest
Folder Structure
├── packages
│   └── mypackage
│       ├── package.json
│       └── src
│           └── index.ts
├── playground
│   ├── favicon.svg
│   ├── index.html
│   ├── package.json
│   └── src
│       ├── main.ts
│       ├── style.css
│       └── vite-env.d.ts
├── netlify.toml
├── package.json
├── pnpm-lock.yaml
├── pnpm-workspace.yaml
├── README.md
└── tsconfig.json
As you can see the folder structure above, I will explain of each part of it and what it does.
The packages folder
The packages folder can contains multiple package which will be deployed on npm registry. For example
The playground folder
The playground folder contains your website application that will display the results and debug the packages you’re working on. In this project, I am using Vite to scaffold with the best performance, it also high in flexibility on plugin or framework you want to use.
Installation
Here are the steps you can follow to install the boilerplate before start building your library:
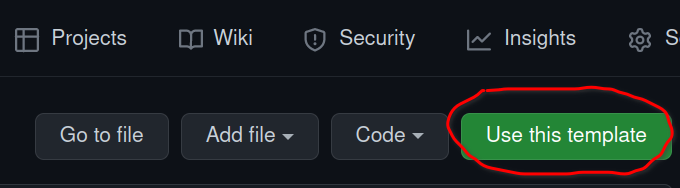
Click on “Use this template” in the vite-ts-starter repository. This will create your own repository with the copy of vite-ts-starter contents.
After your repository is made, clone the repository.
git clone https://github.com/YOUR_USERNAME/YOUR_REPOSITORY.git
cd YOUR_REPOSITORY
Install the dependencies. You can use npm, yarn, or pnpm. But I suggest you to use pnpm in this case.
pnpm install # or npm installRun it locally. We will run two command, the command to serve the
playgroundproject, then run the command to compile all package in thepackagesfolder. You will need it to run in two tab of terminal or cmd.Compile the packages:
pnpm run js:dev # or npm run js:devServe the
playground:pnpm run dev # or npm run devYou can visit
localhost:3000once the Vite server is running.
Building your library
The first thing to do is changing your library info in package.json file in packages/mypackage/package.json. You can change the value of name, version, description, author, repository, bugs, and you can change or add something like funding as well.
{
  "name": "mypackage", // Must be UNIQUE
  "version": "1.0.0", // Set up your first version
  "description": "", // Library description
  "main": "dist/index.js",
  "module": "dist/index.mjs",
  "types": "dist/index.d.ts",
  "unpkg": "dist/index.global.js",
  "jsdelivr": "dist/index.global.js",
  "files": ["dist"],
  "author": "zuramai <saugi.dev@gmail.com>",
  "license": "MIT",
  "repository": {
    "type": "git",
    "url": "git+https://github.com/zuramai/vite-ts-starter.git"
  },
  "bugs": {
    "url": "https://github.com/zuramai/vite-ts-starter/issues"
  },
  "scripts": {
    "dev": "nr tsup --watch",
    "tsup": "tsup src/index.ts --format esm,cjs --dts --no-splitting --clean",
    "build": "nr tsup",
    "prepublishOnly": "nr build"
  }
}
After you decided what name it would be, you also need to change the imported library name in some files.
In tsconfig.json, change your library name in this part (see image) so the IDE or editor can resolve what package you’re actually using. Change mypackage to your desired name.
"paths": {
    "mypackage": ["./packages/mypackage/src/index.ts"]
}
And then you can finally start working! You can get started to create your functions in packages/{your_package}/src/index.ts file.

To make it visual and debug easily, open the file in playground/src/main.ts file to start using your library.
Build and Deploy to NPM Registry
We are deploying two things in here: the playground (demo) page and the packages to npm registry. Make sure you have set up the correct version in package.json for the first time.
The playground project will be deployed on top of Github Pages. And all the packages will be released with npm release.
Deploy the packages
Login to npm (skip if you have logged in)
pnpm login # or npm login
and you will asked for your npm username, password, and email OTP.

Run the build release command.
pnpm run build
pnpm run release
In the terminal, you will asked what version you want to bump. It is using semantic versioning for version naming.

After the version is chosen, the build and deployment to npm registry will start. If the deployment is success, in the terminal, you will get something like this (I’m using rolloc library as an example):

Deploy the playground to Github Pages
This boilerplate is already bundled with Github Actions, you can check the file out in .github/workflows/main.yml. Every time you push it to the main branch, it will automatically create and deploy to gh-pages branch.
To check if the deployment is running correctly, go to your repository pages, open Actions tab, and you can see the workflow status of the Continuous Integration. If it’s green check mark, it means success.

After that, go to your repository Settings, choose Pages menu, and then choose gh-pages branch as your source.

Click save, it should shows the success alert and give you the link to the live web page.

Done! Your npm packages successfully deployed and the demo page is up. You can start share your work to your friends, family and arrange a party!
Conclusion
It won’t be hard to start building your own library if you gather all the perfect tools to assist your work. And I have made a boilerplate or starter kit to instantly get ready for working on new library. I hope your library will be a great success and continue to spread the benefits to other developers. I am open to any question if you need my help, leave a comment below and I will respond as soon as possible.