Optimizing Image Pipelines for AI Inference in Rust
When implementing AI pipelines in Rust, especially with images, optimizing data transformations means paying close attention to how the data moves through the system. Is it being copied, cloned, or referenced?
Previously, I wrote about how we are rewriting our services to Rust for our AI pipeline which works heavily with images. In this article, we will deep dive into how we process and transform images throughout the pipelines to finally transform the data into outputs for AI models.
We will be using the three essential image processing crates: image, ndarray, and OpenCV. I will show you how to transform the data to OpenCV’s Mat in case you want to utilize OpenCV as the main image processing crate. We will go through how the data should be transformed efficiently from one type into another and comparing the speed difference between them.
The most basic AI workflow is to load the image, do the preprocess, then inference, and lastly postprocess to get the desired result.

We will get through this workflow step by step of how we can get the desired result from a single image.
Disclaimer
For the sake of simplicity, the code that is written here are using
.unwrap(). You need to use a proper error handling in real-world use cases.
Here’s our Cargo.toml that we will be using in this article:
[dependencies]
fs = "0.0.5"
image = "0.25.10"
ndarray = "0.17.2"
opencv = { version = "0.98.2", features = ["clang-runtime"] }
ort = "2.0.0-rc.12"
tokio = { version = "1.52.1", features = ["full"] }
Parsing image
Let’s say our Rust application accepts file upload which the backend receive the binary data of an image. The first step is to convert the binary data to an image type. In Rust, the binary data type is Vec<u8> which is a byte sequence representing the compressed image data.
fn bytes_to_dynamic_image(bytes: &[u8]) -> DynamicImage {
    let reader = ImageReader::new(Cursor::new(bytes))
        .with_guessed_format()
        .unwrap();

    reader.decode().unwrap()
}
The image formats that can be guessed by with_guessed_format are Png, Jpeg, Gif, WebP, and many more. The decode() function will retrieve the actual RGB/RGBA pixel data and store it as DynamicImage type. Keep in mind that it will be stored as a decompressed format so that a 44kb PNG image can be decompressed to megabytes.
DynamicImage is a simple enum containing many kinds of images with different color spaces including RGB and RGBA. Each variant can store up to 16-bit images. Here’s the code of the DynamicImage enum:
pub enum DynamicImage {
    /// Each pixel in this image is 8-bit Rgb
    ImageRgb8(RgbImage),

    /// Each pixel in this image is 8-bit Rgb with alpha
    ImageRgba8(RgbaImage),

    /// Each pixel in this image is 16-bit Rgb
    ImageRgb16(Rgb16Image),

    /// Other types...
}
The pixels are packed in order, meaning the channels of a single pixel are kept together. e.g., [R, G, B, R, G, B, R, G, B]. Next, we’re going to transform the image into the types we needed for.
Image transformations
Converting images to ndarray
ndarray is really useful if you want to mutate pixels data. It provides a bunch of array transformation functions just like Python’s ndarray. Assume that our image has type Rgb8 and we want to convert it to ndarray::Array3.
Transforming image data to arrays might be tricky. The naive and intuitive approach that comes to mind is to loop over every pixel and copy it into a new array like this:
fn image_to_ndarray(image: &ImageBuffer<Rgb<u8>, Vec<u8>>) -> ndarray::Array3<u8> {
    let mut array = Array3::zeros((height, width, 3));
    for (x, y, pixel) in image.enumerate_pixels() {
        array[[y, x, 0]] = pixel[0];
        array[[y, x, 1]] = pixel[1];
        array[[y, x, 2]] = pixel[2];
    }
    array
}
For a 1920×1080 image, that is 2 million iterations—an inefficient way to convert the image to an ndarray.
Instead, we can get the image as raw buffer data, then copy it to a new array via copy_from_slice:
fn image_to_ndarray(image: &ImageBuffer<Rgb<u8>, Vec<u8>>) -> Array3<u8> {
    let (width, height) = (image.width(), image.height());
    let mut array = Array3::<u8>::zeros((height as usize, width as usize, 3));
    array.as_slice_mut().unwrap().copy_from_slice(image.as_raw());
    array
}
The function copy_from_slice is executing ptr::copy_nonoverlapping underneath which basically equivalent to C’s memcpy. It’s significantly faster than iterating pixels one by one. Here’s the benchmark result:
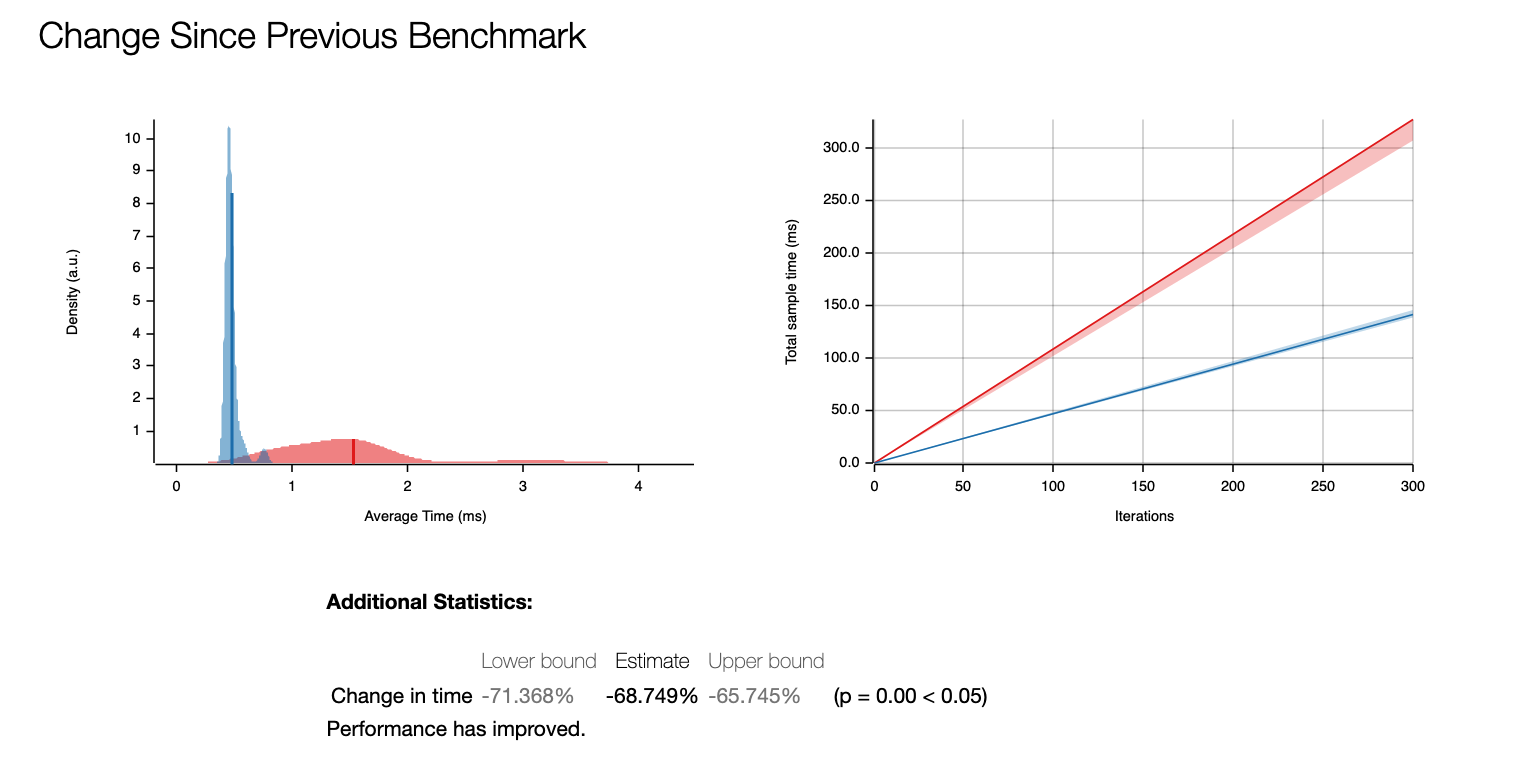
This gives us ~68% improvement!
While the above approach works well for simple cases, many real-world use cases require more complex image processing. This is where OpenCV becomes useful. Instead of converting directly to ndarray, we can convert it to OpenCV’s Mat first to perform additional transformations, then convert to ndarray.
OpenCV image transformations
If you need image processing using OpenCV, we can use opencv-rust crate. OpenCV Rust uses opencv::core::Mat to store n-dimensional array to manipulate numerical data.
To do the conversion between DynamicImage and OpenCV Mat, we need to get the underlying Rgb8 buffer. We call to_rgb8() to ensure we have the right format, then pass the raw bytes directly into the Mat constructor.
fn dynamic_image_to_mat(img: &DynamicImage) -> opencv::Result<Mat> {
    let rgb_img = img.to_rgb8();
    let width = rgb_img.width() as i32;
    let height = rgb_img.height() as i32;
    let sizes = vec![height, width];

    unsafe {
        Mat::new_nd_with_data_unsafe(
            &sizes,
            opencv::core::CV_8UC3,
            rgb_img.as_raw().as_ptr() as *mut _,
            None,
        )
    }
}
The opencv::core::Mat::new_nd_with_data_unsafe function provides Mat initialization with a pointer to the existing data in memory. It’s extremely cheap. We don’t need to copy or move the underlying pixel data from the DynamicImage.
Preprocess and inference
Most AI models, particularly models that accept images as input, require preprocessing before inference. This is because most AI models are trained on specifically preprocessed images and accept a specific image size.
Let’s say we have a model that accepts an input with shape [1, 3, 224, 224] which is an image resized to 224×224 in CHW (channel, height, width) order. To process the image into that format, we need to do the following steps before it’s fed to the model:

First, we resize the original image. There are many crates that can help you resize the image, such as fast_image_resize, pic_scale, OpenCV resize, as well as the default image crate. In this case, I will just use the simple image crate for resizing.
use image::imageops;

fn resize_image(img: DynamicImage, width: u32, height: u32) -> DynamicImage {
    imageops::resize(img, width, height, imageops::FilterType::Triangle)
}
Normalize image: ndarray way
After resizing the image, we normalize the values from 0-255 to 0-1 range using this normalize_image function. There are two ways to perform image normalization. We will demonstrate the difference between the slow vs the optimized version.
The naive way to convert an image to a normalized CHW array is to loop all over the pixels and divide the number by 255.
use ndarray::Array3;
use image::{DynamicImage, GenericImageView};

fn normalize_image(image: DynamicImage) -> Array3<f32> {
    let rgb_image = image.to_rgb8();
    let (width, height) = rgb_image.dimensions();
    let raw_pixels = rgb_image.as_raw();
    let mut arr = Array3::<f32>::zeros((3, height as usize, width as usize));

    for y in 0..height as usize {
        for x in 0..width as usize {
            let idx = (y * width as usize + x) * 3;
            arr[[0, y, x]] = raw_pixels[idx] as f32 / 255.0;
            arr[[1, y, x]] = raw_pixels[idx + 1] as f32 / 255.0;
            arr[[2, y, x]] = raw_pixels[idx + 2] as f32 / 255.0;
        }
    }
    arr
}
This function transforms a DynamicImage to a three-dimensional array using ndarray::Array3. But beware that this function has an expensive time and space complexity O(width * height) because it iterates over all the pixels.

Writing into a arr[[0, y, x]], arr[[1, y, x]], arr[[2, y, x]] means we are writing into memory addresses that is separated by height * width * sizeof(f32), which potentially megabytes apart. The compiler sees it as an irregular/strided writes and no clear SIMD pattern because each lane would need to write to a different region of memory.
The more efficient way is to get the raw pixels of the image, then do a single linear scan of memory.
fn normalize_image(image: DynamicImage) -> Array3<f32> {
    let rgb_image = image.to_rgb8();
    let (width, height) = rgb_image.dimensions();
    let raw_pixels = rgb_image.as_raw();
    let num_pixels = (width * height) as usize;

    let mut arr = Array3::<f32>::zeros((3, height as usize, width as usize));
    let arr_slice = arr.as_slice_mut().unwrap();

    // Process in chunks of 3 (RGB) -> write to channel-major layout
    for (pixel_idx, chunk) in raw_pixels.chunks_exact(3).enumerate() {
        arr_slice[pixel_idx] = chunk[0] as f32 / 255.0;
        arr_slice[pixel_idx + num_pixels] = chunk[1] as f32 / 255.0;
        arr_slice[pixel_idx + 2 * num_pixels] = chunk[2] as f32 / 255.0;
    }

    arr
}
The arr.as_slice_mut() gives you a contiguous &mut [f32], allowing you to mutate the array of zeros we initialized. We access the memory, then loop over the bytes and write it to arr_slice through simple pointer and offset.
We’ll later replace this approach with OpenCV for better performance and flexibility
Normalize image: opencv way
Before we normalize the image, we swap the color space from RGB to BGR, because OpenCV generally uses the BGR color space. Like in C++ OpenCV, we create an empty Mat as the result produced by cvt_color.
let mut bgr = Mat::default();
opencv::imgproc::cvt_color(
    &mat,
    &mut bgr,
    COLOR_RGB2BGR,
    0,
    opencv::core::AlgorithmHint::ALGO_HINT_ACCURATE,
).unwrap();
The resulting BGR image memory layout is still HWC (Height-Width-Channel). We need to convert it to CHW first alongside normalizing the values.
Why do we need to convert to CHW (Channel-Height-Width) format?
OpenCV uses HWC (Height-Width-Channel) data format for image processing. Meanwhile, PyTorch generally uses CHW (Channel-Height-Width) channel order for inference. So, we are going to have a few data transformations throughout the preprocess.
fn mat_to_array3_normalized(mat: &Mat) -> Array3<f32> {
    let mut float_mat = opencv::core::Mat::default();
    mat.convert_to(&mut float_mat, opencv::core::CV_32F, 1.0 / 255.0, 0.0)
        .expect("normalize failed");

    assert!(float_mat.is_continuous(), "Mat data must be contiguous");

    let height = float_mat.rows() as usize;
    let width = float_mat.cols() as usize;
    let total = height * width * 3;

    let data: &[f32] = unsafe {
        std::slice::from_raw_parts(float_mat.data() as *const f32, total)
    };

    Array3::from_shape_vec((height, width, 3), data.to_vec())
        .unwrap()
        .permuted_axes((2, 0, 1))
}
The whole preprocess code
Putting it all together, we got the Array3<f32> which we will pass it to the model.
fn preprocess(img: DynamicImage) -> Array3<f32> {
    let resized = Self::resize_image(img, 224, 224);
    let mut mat = Self::dynamic_image_to_mat(&resized).expect("Failed to convert image to Mat");

    // convert RGB to BGR
    let mut bgr = Mat::default();
    opencv::imgproc::cvt_color(
        &mat,
        &mut bgr,
        COLOR_RGB2BGR,
        0,
        opencv::core::AlgorithmHint::ALGO_HINT_ACCURATE,
    ).unwrap();
    mat = bgr;

    Self::mat_to_array3_normalized(&mat)
}
Inference with onnxruntime
Let’s say we are going to have a model for object detection, the model returns an array of bounding boxes with shape [-1, 4], with each bounding box containing [top_left_x, top_left_y, bottom_right_x, bottom_right_y] that scales from 0 to 1 (on the scale of the normalized image).
We initialize the struct with ort::Session:
struct ObjectDetector {
  session: ort::session::Session,
}

impl ObjectDetector {
    fn new(model_path: &str) -> Self {
        let session = ort::session::Session::builder()
            .unwrap()
            .commit_from_file(&model_path)
            .unwrap();

        Self { session }
    }
}
Assume the onnx model has this following spec:
{
  "name": "object-detector",
  "inputs": [
    {
      "name": "input",
      "datatype": "FP32",
      "shape": [1, 3, 224, 224]
    }
  ],
  "outputs": [
    {
      "name": "output",
      "datatype": "FP32",
      "shape": [-1, 4]
    }
  ]
}
The input shape is an image that we have preprocessed before. And the output shape is an array of arrays with size 4 which we will parse into Array2<f32>.
And then we add the infer function:
fn infer(&mut self, data: Array3<f32>) -> Array2<f32> {
    let input_values = vec![("input", ort::value::Value::from_array(data).unwrap())];

    let output = self.session.run(input_values).unwrap();

    let output = output["output"]
        .try_extract_array::<f32>()
        .unwrap()
        .to_owned();

    // output.1 has type ArrayD<f32>, so we will convert it to Array2<f32>
    output.into_dimensionality::<ndarray::Ix2>().unwrap()
}
We want the output to be a bounding box struct like this:
struct BoundingBox {
    x: f32,
    y: f32,
    width: f32,
    height: f32
}
We need to go to the next step which transforms the raw output to the result we desired.
Postprocess
Because the model returns between 0 to 1, we need to scale it back to the original image pixel size. The data parameter holds four values: [x1, y1, x2, y2] we want to transform it to a more readable struct.
fn postprocess(original_image_size: (u32, u32), data: Array2<f32>) -> Vec<BoundingBox> {
    data.outer_iter()
        .map(|bbox| {
            let x = bbox[0] * original_image_size.0 as f32;
            let y = bbox[1] * original_image_size.1 as f32;
            let width = (bbox[2] - bbox[0]) * original_image_size.0 as f32;
            let height = (bbox[3] - bbox[1]) * original_image_size.1 as f32;
            BoundingBox {
                x,
                y,
                width,
                height,
            }
        })
        .collect()
}
Putting it all together
To put it all simply, we put all the functions in a single impl.
use image::{DynamicImage, GenericImageView, ImageReader, imageops};
use ndarray::{Array2, Array3};
use std::io::Cursor;

#[derive(Debug)]
struct BoundingBox {
    x: f32,
    y: f32,
    width: f32,
    height: f32,
}

struct ObjectDetector {
    session: ort::session::Session,
}

impl ObjectDetector {
    fn new(model_path: &str) -> Self {
        let session = ort::session::Session::builder()
            .unwrap()
            .commit_from_file(model_path)
            .unwrap();

        Self { session }
    }
    fn detect(&mut self, image: &[u8]) -> Vec<BoundingBox> {
        let img = Self::bytes_to_dynamic_image(image);
        let img_size = img.dimensions();
        let preprocessed = Self::preprocess(img);
        let result = self.infer(preprocessed);
        Self::postprocess(img_size, result)
    }
    fn preprocess(img: DynamicImage) -> Array3<f32> {
        let resized = Self::resize_image(img, 224, 224);
        let mut mat = Self::dynamic_image_to_mat(&resized).expect("Failed to convert image to Mat");

        // convert RGB to BGR
        let mut bgr = Mat::default();
        opencv::imgproc::cvt_color(
            &mat,
            &mut bgr,
            COLOR_RGB2BGR,
            0,
            opencv::core::AlgorithmHint::ALGO_HINT_ACCURATE,
        )
        .unwrap();
        mat = bgr;

        Self::mat_to_array3_normalized(&mat)
    }

    fn resize_image(img: DynamicImage, width: u32, height: u32) -> DynamicImage {
        imageops::resize(&img, width, height, imageops::FilterType::Triangle).into()
    }

    fn infer(&mut self, data: Array3<f32>) -> Array2<f32> {
        let input_values = vec![("input", ort::value::Value::from_array(data).unwrap())];

        let output = self.session.run(input_values).unwrap();

        let output = output["output"]
            .try_extract_array::<f32>()
            .unwrap()
            .to_owned();

        // output.1 has type ArrayD<f32>, so we will convert it to Array2<f32>
        output.into_dimensionality::<ndarray::Ix2>().unwrap()
    }

    fn postprocess(original_image_size: (u32, u32), data: Array2<f32>) -> Vec<BoundingBox> {
        data.outer_iter()
            .map(|bbox| BoundingBox {
                x: bbox[0] * original_image_size.0 as f32,
                y: bbox[1] * original_image_size.1 as f32,
                width: (bbox[2] - bbox[0]) * original_image_size.0 as f32,
                height: (bbox[3] - bbox[1]) * original_image_size.1 as f32,
            })
            .collect()
    }

    fn mat_to_array3_normalized(mat: &Mat) -> Array3<f32> {
        let mut float_mat = opencv::core::Mat::default();
        mat.convert_to(&mut float_mat, opencv::core::CV_32F, 1.0 / 255.0, 0.0)
            .expect("normalize failed");

        assert!(float_mat.is_continuous(), "Mat data must be contiguous");

        let height = float_mat.rows() as usize;
        let width = float_mat.cols() as usize;
        let total = height * width * 3;

        let data: &[f32] = unsafe {
            std::slice::from_raw_parts(float_mat.data() as *const f32, total)
        };

        Array3::from_shape_vec((height, width, 3), data.to_vec())
            .unwrap()
            .permuted_axes((2, 0, 1))
    }

    fn dynamic_image_to_mat(img: &DynamicImage) -> opencv::Result<Mat> {
        let rgb_img = img.to_rgb8();
        let width = rgb_img.width() as i32;
        let height = rgb_img.height() as i32;
        let sizes = vec![height, width];

        unsafe {
            Mat::new_nd_with_data_unsafe(
                &sizes,
                opencv::core::CV_8UC3,
                rgb_img.as_raw().as_ptr() as *mut _,
                None,
            )
        }
    }

    fn bytes_to_dynamic_image(bytes: &[u8]) -> DynamicImage {
        let reader = ImageReader::new(Cursor::new(bytes))
            .with_guessed_format()
            .unwrap();

        reader.decode().unwrap()
    }

}
And then run it:
fn main() {
    let image_bytes = std::fs::read("test.png").unwrap();
    let mut detector = ObjectDetector::new("model.onnx");
    let boxes = detector.detect(image_bytes);

    println!("{boxes:?}");
}
Conclusion
Throughout this article, we explored how small decisions in data handling can significantly impact the performance of image preprocessing pipelines in Rust. By preferring zero-copy conversions, using copy_from_slice or OpenCV’s convert_to, and being mindful of memory layouts (HWC vs CHW), we can avoid expensive allocations and strided memory access.
While the examples used .unwrap() for brevity, production code should implement proper error handling. The core principles remain the same: minimize unnecessary data copying, respect memory access patterns, and choose the right tool for each stage of the pipeline.
When working with images, deliberate memory management is essential. Poor choices can lead to problems such as Out of Memory (OOM) and excessive CPU usage. Most of the time, you can directly consume the underlying bytes of an image instead of looping over all the pixels. Rust provides powerful tools for memory management. You also have to be conscious about the memory layout because it matters a lot to performance.